Blog Background

Wednesday, January 27, 2010

Cabin Part III - Bathroom

My handy brother-in-law, Colby, is still working away on our family's cabin at the farm. You can read about the progress here and here. The next big undertaking will be adding a bathroom. We can't wait to get down there to help.

The cabin is literally a one room dwelling at the moment. Adding a bathroom would be a major upgrade. And it couldn't have come any sooner if you ask me.

Other than my mother-in-law the majority of people who went out there in the pre-bathroom days were men and boys. Well...that is until Brenna and I came along. Now, I think everybody sees that this is a project that will make all of our experiences at the farm better if you know what I mean.

Siebel's, a local cabin store, has lavatories like the ones photographed below. I think they are perfect for our cabin. Also, I love the sconces flanking each side of the mirrors. They look fantastic.

Erika, a blogger who I enjoy following at Urban Grace Interiors, recently did a post on architect Bill Ingram's cottage and lake house featured in Cottage Living. I had been looking for inspirational bathroom photos for a while and when I saw her post I knew I wanted to use some of Bill's concepts.

Bill tastefully covered a typical fiberglass shower by hanging a beautiful cotton fabric by bead chains from the ceiling. This is a wonderful way to conceal an ordinary and unsighlty shower stall. You can read more about Bill's lake house here.


This bathroom features a feed trough as a tub. How clever. It certainly screams farm.

Note the antler towel "racks." Too cute.


All of these seem like good ideas. Who knows what the bathroom will end up looking like. At least we can draw inspiration from these photos.
sdf
Do you have any ideas or images for a farm bathroom?
zdfg
PS: I wrote about my grandmother's kitchen remodel; however, because I had originally saved it as a draft it is showing up below our "Who Dat" post.

Sunday, January 24, 2010

Who Dat?


Are you familiar with the term "Who Dat?" I have to admit that until I met Judd I had never heard that phrase before. Having grown up in the deep coastal south and being a huge sports fan in general Judd has always had a special place in his heart for the New Orleans Saints. The Saints are the team of his childhood. To say he likes the Saints would be an understatement.


He, as well as the rest of the Who Dat Nation, are on cloud nine this year. The Saints are 14-3 this season. Currently they are playing in the NFC Championship game against the Minnesota Vikings.


I had to make a post about this because I just walked into our living room and found Judd and Cole (and Cole's baby) wearing Mardi Gras beads....and yes, Judd was holding his "lucky" football like a small child. Too funny! They were both intently watching.


On that note, I thought I would tie in some of our Mardi Gras decorations into this post. After Christmas I just couldn't stand to take our decorations down without having something else to put up.

As I mentioned last year we went down to Mobile, AL to experience Carnival with our friends the Atkins family. Over the years we have collected quite a few beads, masks, dubloons, and rolls of serpentine. I put them out around our house. We are truly supporting the saints this year huh? I think we are the only house in our Birmingham neighborhood with Mardi Gras decorations.


Laissez les bons temps rouler!!!!
(This one's for you Jamie!!!!) Wink!

Grandmother's Kitchen Remodel Extravaganza - Part II

Mom and I used our Martin Luther King Jr. holiday to go and help my 85 year old grandmother put her kitchen back together. As previously mentioned, Grandmother is in the middle of a kitchen renovation. The workers are not completely finished but here is the way we left it as of one week ago.

Here's Grandmother to welcome you all inside.

(She'd be mortified if she knew I put this picture up. She was standing in her garage to meet us when we drove up. I think she's adorable. Don't you?)

The workers have been using this space as a workshop. Pardon the mess.
She chose all of the materials by herself because we live a few hours away and couldn't be there to help. I think overall she did a pretty good job. The floor is not necessarily a choice I would have made, however, it is very textured and she said she chose it because she knew she would not fall on it. I don't blame her. After all, this is her kitchen and it should be the way she wants it. It took her 85 years to get the kitchen she's always dreamed of. She deserves to have it just the way she wants it.

Amazingly the rope design cabinets she described to me over the phone were the exact ones I found for my previous post to use as an example of what I thought she had chosen. Isn't a Google images search just amazing?
She chose these 1" tiles as her back splash. I think she made a good choice there.
The granite I had picked out for the other post is remarkably similar to the laminate below from VT Industries. I believe this color is butter rum.
as
Grandmother never got a chance to view my previous post because during the renovation her Internet was down. I think it's kind of funny she and I chose so many similar things.
asdf
Another good choice Grandmother. (I think you did a great job. I know I couldn't redesign my kitchen alone. Kudos to you!)

Here is her floor tile choice. It seemed a little busy at first, but to be honest, once I was in the room for a while it grew on me. Plus, I love the fact that it is a no slip surface.

The handy and kind men who worked on her kitchen scrapped her popcorn ceiling, added crown molding, these two accent lights over the sink, and took down the ceiling fan.
sdf
They really were so sweet to her. They recognized that she was without a cook space for weeks and when they stopped to pick up some breakfast they would bring her a biscuit each morning too.
dsadg
Don't you just love southern gentlemen?

They also added regular pot lights. This is a major improvement in her kitchen!

I just thought this was cute. Grandmother re-did her bathrooms about two years ago. Judd and I bought her a bathroom set when the rooms were complete. She thought the soap dispenser from the set was pretty and put it next to her new sink.

She also had her refrigerator moved all of the way across the room. It is in a much better spot now. It's amazing how much more functional her kitchen is now. This move really opened up her breakfast nook too.
asdf
I don't have any pictures of the breakfast nook side of the room yet. The men were working over there as I was taking these pictures. I'll do a new post on the entire finished project next time we go over there.

Here's a better view.


She has also ordered a new dishwasher. Obviously this one's got to go.

I am really happy for Grandmother to have such a nice space.
dfh
I can't think of anyone who deserves it more. She is a wonderful, beautiful, talented, kind, intelligent, and loving woman.
sdfg
She is my role model.

Oh yeah, she also had her 1990's blue carpet taken up in her great room. She chose a laminate wood floor.
sdfhg
I LOVE it!
sdfg
It makes the biggest difference. It fills this room and goes all of the way down the hall. She is also having it put in her bedroom.


And because I attempted to describe her great room ceiling before without much luck, here is a picture. I want to take down those ceiling fans next and replace them with a chandelier or two. What do you think?
Here's a pic of the whole great room. Again, pardon the mess. Things are still under construction. And this shot was taken right before we packed up to go home. I spy some Vera Bradley and a pillow. Gah, I should've put that in the car first. :)

Thursday, January 21, 2010

Wanna Come Home With Me?

Here are some things every southern girl needs.


Oh wait, maybe these are just some things this southern girl wants (oops I mean needs).


And....she won't be getting any of them any time soon. Thanks car insurance, thanks student fees, thanks textbooks, thanks oil change, thanks $300 gas bill from our Arctic blast, thanks expired license plate and ticket to go with you...all of you are keeping me from what my little heart desires.


Judd, are you reading this???? If so, note two things. I am being so good and only e-window shopping. And....


I think I see a Valentines Day present down there somewhere (hint: go with the boots they're the cheapest!)


These little babies are such a great find. I can't justify paying for their name brand twin (Frye). I just don't go to places that require what my husband calls S**T kickers all that often. But when I do, I wanna be wearing these! They're from Target. Now for the price I think they'll do just fine the 3-5 times a year I'll wear them at the farm.

Guess how much they cost?


Can you guess?


You'll never believe it.


$49.99!!!


Here is a totally different end of the spectrum item I am eyeing. It is the Waterford Lismore ice bucket that is a part of our Waterford Lismore Tall pattern we chose for our wedding registry.


I want this.


I need this.


It is usually around $300 and is at Bed, Bath, and Beyond for around $149.

Now, if this isn't a true southern girl post than I don't know what it is.
dfgy
fghj
xfgh
Boots and crystal. They're like bread and butter if you ask me.
hjk
gjk
cghk
My two deepest desires at the moment.
vhjl
hbl
Gosh, this reminds me of the time I bought some earrings and a boat paddle at the Hourglass in Brewton. I thought that purchase went together perfectly. No?

Thursday, January 14, 2010

South Alabama Gumbo


Preparing and devouring a seafood feast is a Christmas Eve tradition with my in-laws. Their hometown, Brewton, Alabama, is approximately 5 miles from the Florida state line. It is also only about 1 and 1/2 hours from Mobile, AL. This second locale is important because of our dear friends the Atkins. The Atkins family has owned Southern Fish & Oyster wholesale seafood supply for several generations. (You can reach them here (251) 438-2408.) The fish house is located on the Mobile River and supplies the freshest seafood in town to almost all of the local restaurants. Having wonderful friends who can sell you the absolute best seafood you've ever tasted comes in handy you know.

We drove down to Mobile the day before Christmas Eve to get some crab claws, Alabama Gulf Coast shrimp, and to visit our dear Aunt Weise. She is a whole 'nother blog post entirely. She's a famous water colorist who lives in Fairhope, AL. Her paintings are signed with her first name only, Willoweise. You'll have to keep your eye out for her work. Again, I'll do a post solely about her later.

Judd has become the gumbo king in our family. In the midst of the Christmas craziness going on around us, we attempted to document how to make this delicious dish. He's going to walk you through the process in a few but first....

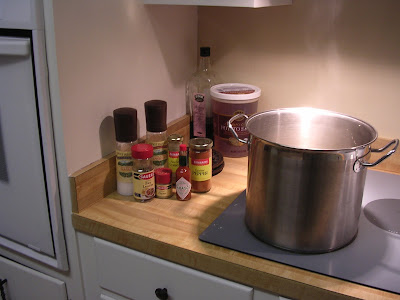
Here are the ingredients you'll need:

2 tablespoons all-purpose flour
2 tablespoons butter
1 onion, chopped
1 green bell pepper, chopped
1 tablespoon chopped garlic (2-3 cloves)
2 cups diced Conecuh sausage (for all of you non-Alabamians this is pronounced Ca-neck-ah. You can click the link above to find their website. This sausage is made here in the heart of dixie in Evergreen, Alabama.)
2 stalks of celery, diced
1 to 2 lb's of "16-20's" or Jumbo Gulf Coast Shrimp (peeled and de-veined)
1 lb container of Crab Claws (Cocktail Crab Fingers)
4 cups of Swanson's chicken broth (very important....no MSG)
One 28-ounce can diced tomatoes
2 cups cut okra
1 teaspoon dried thyme
2 bay leaves
1/2 teaspoon cayenne pepper (Tabasco is a great substitute....but we use both)
1 teaspoon file powder or until desired thickness (this is pronounced Fe-lay).
Salt and Pepper to taste
as
Note: The okra can also come from a frozen package of gumbo vegetables. We used this method for the batch below. It usually has corn, okra, celery, and red bell pepper. This is not a substitute for the fresh green bell pepper or diced fresh celery found above.
asd
Serves 10-12

Judd here......Abby's insisting that I write my own process of making our gumbo.....so here goes nothing. Step 1: Get the freshest local seafood (yes.....it does matter).
Quick fact: when it comes to shrimp, the jargon has no industry regulations. The more universal technique measures shrimp by the count, or number. If the shrimp are "16-20s," that means there are 16 to 20 shrimp per pound, regardless of the label's large, extra-large, or jumbo designation (courtesy of Coastal Living).
Step 2: Peel jumbo shrimp.
Step 3: De-vein shrimp with a shrimp deveiner (come on....it's the south...they sell them at your local grocer). If you're not from the south or coastal areas, you could use a knife, but the logic behind the deveiner is that the curvature of the instrument depicts the curvature of the shrimp itself. It is a miracle utensil if you ask me. (Below-my dad deveining)
Step 4: Rinse promptly with cold water.


Step 5: Read carefully......the roux is the most important step of the gumbo process. In a 5qt pot combine the flour and butter and cook over medium heat stirring constantly, until the roux has browned. The ideal color you're looking for is chocolate.

Step 6: Add the onion, green bell pepper and garlic and saute for 2 minutes.

The fragrance of these ingredients mixed together will blow you away! Even Justin Wilson himself would say "Oooooweee dat smell goooood!"

You have to man your station for a brief moment, but after mixing the ingredients......perfection is effortless and inevitable!


Step 7: Add sausage (browning for a minute), add chicken broth, diced tomatoes, celery, okra (or frozen gumbo vegetables), thyme, bay leaves and cayenne and bring to a quick boil. Simmer over low heat for 45 minutes.

Step 8: Throw in the crab claws a minute or two before you add the peeled shrimp and cook for 10 minutes. Add file powder and salt and pepper to taste.


Step 9: Cook white rice by a 2:1 ratio of 2 cups water to 1 cup rice for approximately 20 minutes.(note: I like it a bit dryer than most).

Step 10: Pour your gumbo over rice, throw a French baguette in the oven dressed with some olive oil, sea salt, butter, and Tony's Chachere's (we like to call it creole seasoning in South Alabama).
Plate the rice, gumbo, and bread and devour!

Wednesday, January 13, 2010

Cabin Part II - Shutters


My brother-in-law, Colby, and his friend Ryan have been working hard on the cabin I posted about here.
zsf
Most recently they have installed a pine tongue and groove floor and ceiling and inserted a gas range into the kitchen side of the double sided fireplace. (The kitchen part of the chimney is interesting because the opening is waist high. It was originally used as a grill/cooking area.) I think putting a range in that space was a great idea! The kitchen is VERY small and this will be such a space saver. Plus it will make that hole in the chimney a usable space.
cghj
I think I have some pictures of their work in progress so far. I'll have to look for them and add them to this post later.
fygt
In the mean time, Colby has ordered a few new windows to replace some of the old ones. The cabin is in a very remote spot. We fear that once it is renovated it might become a tempting place for vandals. The cabin was vandalized about 25 years ago and my in-laws were so distraught about it that they never re-did it...until now.
hjl
For aesthetic and security purposes we think shutters that close would be great. Since no one lives at the farm full time this would be a great solution. Just close 'em up and lock them from the inside when we leave. I think board and batten shutters would look the best. Below are some examples and some "how to" directions.

How to Build Batten Board Shutters
Contributor: Ryder Von Tripe

Things You'll Need:
Tape measure
Waterproof wood glue
Wood
Nail gun
Wood stain or paint

Measure your windows. To know how much wood you will need for your batten board shutters, you will need to first measure your windows. Measure the height and width of your windows with a tape measure. Your shutters should be as tall as the window but half as wide as the window.

Step 2
Purchase the wood. Go to your local home-improvement store to purchase wood for the shutters. You can choose any type of wood that you like, but cedar is a popular choice because it is durable. Each shutter will usually consist of three vertical pieces and two horizontal pieces, for a total of six vertical pieces and four horizontal pieces per window. If you have larger than normal windows, you might need additional vertical pieces. Use the measurements of your window as a guide. You can get the wood cut to the appropriate size at the home-improvement store.

Step 3
Assemble the boards. Lay out your boards, the vertical pieces, together on a flat surface. Only put the boards together for each shutter, not the entire shutter set. Typically this will be three boards. Lay them side-by-side so that they are even and together. Connect them to each other with waterproof wood glue.

Step 4
Attach the battens. Measure between 8 and 12 inches from the top and bottom to place your battens on the boards. Apply some waterproof wood glue to secure the battens to the boards. Then use a nail gun to attach the battens to the boards. Be sure to drive the nails through the outward facing side of the shutter. Apply nails every 4 to 6 inches.
Step 5
Paint or stain the shutters. To complete your batten board shutters, apply some waterproof outdoor wood stain or paint to the shutters. You can get this, as well as a brush for applying it, at your local home-improvement store. Apply and let dry according to directions on packaging. Once they are dry you can attach the shutters to your home with four 2.75-inches long screws, one in each corner, and a drill. Attach with screws no matter what the exterior of the home is, such as brick or siding.
vhj
Here's another "How To" from Lowe's. However, I am not sure if their directions are for decorative or functional shutters.

When conducting a quick Google search, architectural depot came up with a few purchasable options.

Premier Shutters of New England also has a nice website and product. Their shutters are the ones shown in between the directions above.